This tutorial will walk you through the very basics of getting a Window to show up (and start customizing it) with CommonQt. If you need to, you can install CommonQt easily here. This tutorial assumes a basic familiarity with programming in Lisp.
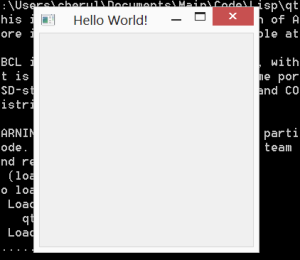
In this tutorial, we’ll make a very simple application: a blank window with the title “Hello World!” We will write these into a Lisp file that you can name whatever you want. Mine is called helloworld.lisp.
Our strategy will be to create a class called hello-world-app that subclasses QWidget, set some properties of this class, and then run it.
1. Load CommonQt
The first thing to do in this file is load CommonQt with Quicklisp. Then, set the current package and readtable to Qt. (One thing this allows us to do is reference things in Qt without prefacing them with “qt::”.)
(ql:quickload :qt)
(in-package :qt)
(named-readtables:in-readtable :qt)
2. Subclass QWidget
Now, let’s create a subclass of QWidget with a descriptive name: hello-world-app. You must include the line about the metaclass. In the case of qt-superclass, only include this when you’re subclassing a class that doesn’t already have it. So, for instance, if we were to subclass hello-world-app with something, that class would not have to specify a qt-superclass.
Here’s what our class definition looks like so far:
(defclass hello-world-app () ()
  (:metaclass qt-class)
  (:qt-superclass "QWidget"))
The next step is writing the constructor for the class. Make sure you always call the C++ constructor using “(new instance)” as seen below:
(defmethod initialize-instance :after
  ((instance hello-world-app) &key)
    (new instance))
3. Two useful methods: setGeometry and setWindowTitle
At this point, we have defined a nice subclass of QWidget. However, it doesn’t do anything. Let’s add two method calls to initialize-instance to customize this window a bit. In CommonQt, you can call instance methods by adding “#_” to the method name, which you will see below.
setGeometry(x, y, width, height)
The setGeometry method does two things at once: It positions the window on the screen, and sets its size. It takes four integer arguments. The first two arguments are the coordinates (x,y) of the top left corner of the window on your computer screen. The second two arguments specify the width and height of your window, in that order.
Let’s say we want our app to spawn at (200,200) on our screen, and have a size of 300×300. We can add a setGeometry call to our constructor like this to do that:
(defmethod initialize-instance :after ((instance hello-world-app) &key)
  (new instance)
  (#_setGeometry instance 200 200 300 300))
Make sure you pass “instance” to setGeometry (this represents the current instance that’s being initialized).
setWindowTitle(string)
The method setWindowTitle is not so complicated: You simply give it a string, and it will set that as the title of your window. We can set our window’s title to “Hello World” by adding a setWindowTitle call like so:
(defmethod initialize-instance :after ((instance hello-world-app) &key)
  (new instance)
  (#_setGeometry instance 200 200 300 300)
  (#_setWindowTitle instance "Hello World!"))
Now, we’ve finished making and customizing our hello-world-app. All we need to do now is run it…
4. Finally: The main application loop!
The last step is to make a QApplication, instantiate hello-world-app, and run the loop! To do this, we first call make-qapplication to create our application. This can only be called once.
(make-qapplication)
Now, we will create a new instance of hello-world-app called window, and use a nice macro called with-main-window to display it and execute the app:
(with-main-window (window (make-instance 'hello-world-app)))
with-main-window contains a call to (#_show window) and (#_exec *qapplication*) – that is, it shows your window instance, and then starts your main application loop.
Now, you should be able to open up your REPL, type
(load "helloworld.lisp")
and see a nice blank window with the title “Hello World!”

Of course, this isn’t THAT exciting. But you now know how to set up a basic application. In the next tutorial, we add some GUI elements to our window, and even start playing with Qt’s signals and slots.
The full source code for this tutorial can be found here. If you’re having trouble getting your program to run, you can compare it with this source to see what might be going wrong.